

There are so many plates that you have to keep spinning when you run a business, from keeping track of client projects to marketing and promotion to administrative tasks and everything in between.
It’s impossible to keep up with all of these tasks from memory.
And as much as I love traditional paper planners, it’s difficult to keep up with them all in there, too, especially if you have a team.
That’s where a project management system like Asana can be life changing; it acts as a homebase for all of the tasks involved in running your business.
But just like any app, it takes some time to learn how to use Asana effectively.
So today I’m inviting you behind the screen to show you exactly how to set up Asana from scratch.

1 | Set up your Asana account
Getting started with Asana
The registration process is super simple (and it’s free!). Simply visit asana.com, click the Get Started button in the top right corner, and walk through the steps to sign up.

It’s important to note that in order to sign up for Asana, you must have a specified business email account.
Once your account it set up and ready to go, you’ll see a fresh workspace in front of you.

If you’re someone like me, this blank canvas is really exciting. If not, you might be a little confused as to how to get started.
Not to worry! We’ll get there in just a minute.
Inviting team members
But first, for those of you who have a team, go ahead and add your team members before adding projects and filling up your dashboard.
Click the Invite People text in the left column, enter an email address for each member of your team, and they’ll receive an invitation to join your Asana workspace.

This will come in handy as you begin to assign tasks in the coming steps.
2 | Create a new project for each area of your business
Setting up a new project
Asana projects are simply lists of tasks. They’re the overarching goal you’re working toward; the big picture.
You can break down those projects into smaller tasks and subtasks, moving from the big picture to the smaller details.
You can add a new project to your workspace by clicking the + icon next to Projects in the left menu.

The difference between lists and boards
Asana gives you two options for setting up your project: You can either set it up as a List or a Board.
A list is simply what it sounds like - a list of tasks.
But a board is similar to Trello. You can organize your tasks into columns, much like sticky notes on a dry erase board.
I use both options, depending on the scope of the project. I’ll get to that in a moment.
But first, it’s important to consider how you’re going to organize your business tasks into projects.
Instead of setting up a project for each literal project...
I use Asana to keep up with tasks in each area of my business: Design work, client work, Ellechat webinars and podcast episodes, blog posts, newsletters, online courses and more.
Your business might be similar. You might have several other tasks that fall into categories outside of client work.
So instead of creating an Asana project for each individual client project, I’ve found it helpful to create an Asana project for each area of my business.
Here’s how I do it.
Setting up a project for client work
Instead of setting up a separate project for each client, I create one project for each area of my client work: one for design clients, one for coaching clients.
I set up each project as a list…

...and create a task for each individual client.

You can also add sections to your lists by hovering over the Add Task button and clicking the Add Section button that appears. If you want to be a super Asana pro, just add a colon after typing out your text and it will automatically create a new section.

I often do this to organize my clients into past, current, and future clients.

You can then rearrange the section titles and the individual tasks by dragging and dropping them into place.
Setting up a project for product development and launches
Do you offer any digital products, physical products, or online courses?
Setting up a specific project for each product in Asana can help you organize and manage all of the tasks involved in creating and launching it to your audience.
Start by creating a new project and choosing the list view.

Then create new sections for each stage of the product development and launch process by hovering over the Add Task button and clicking Add Section.

Once each stage is sectioned off, you can start to add tasks for each step of the process.

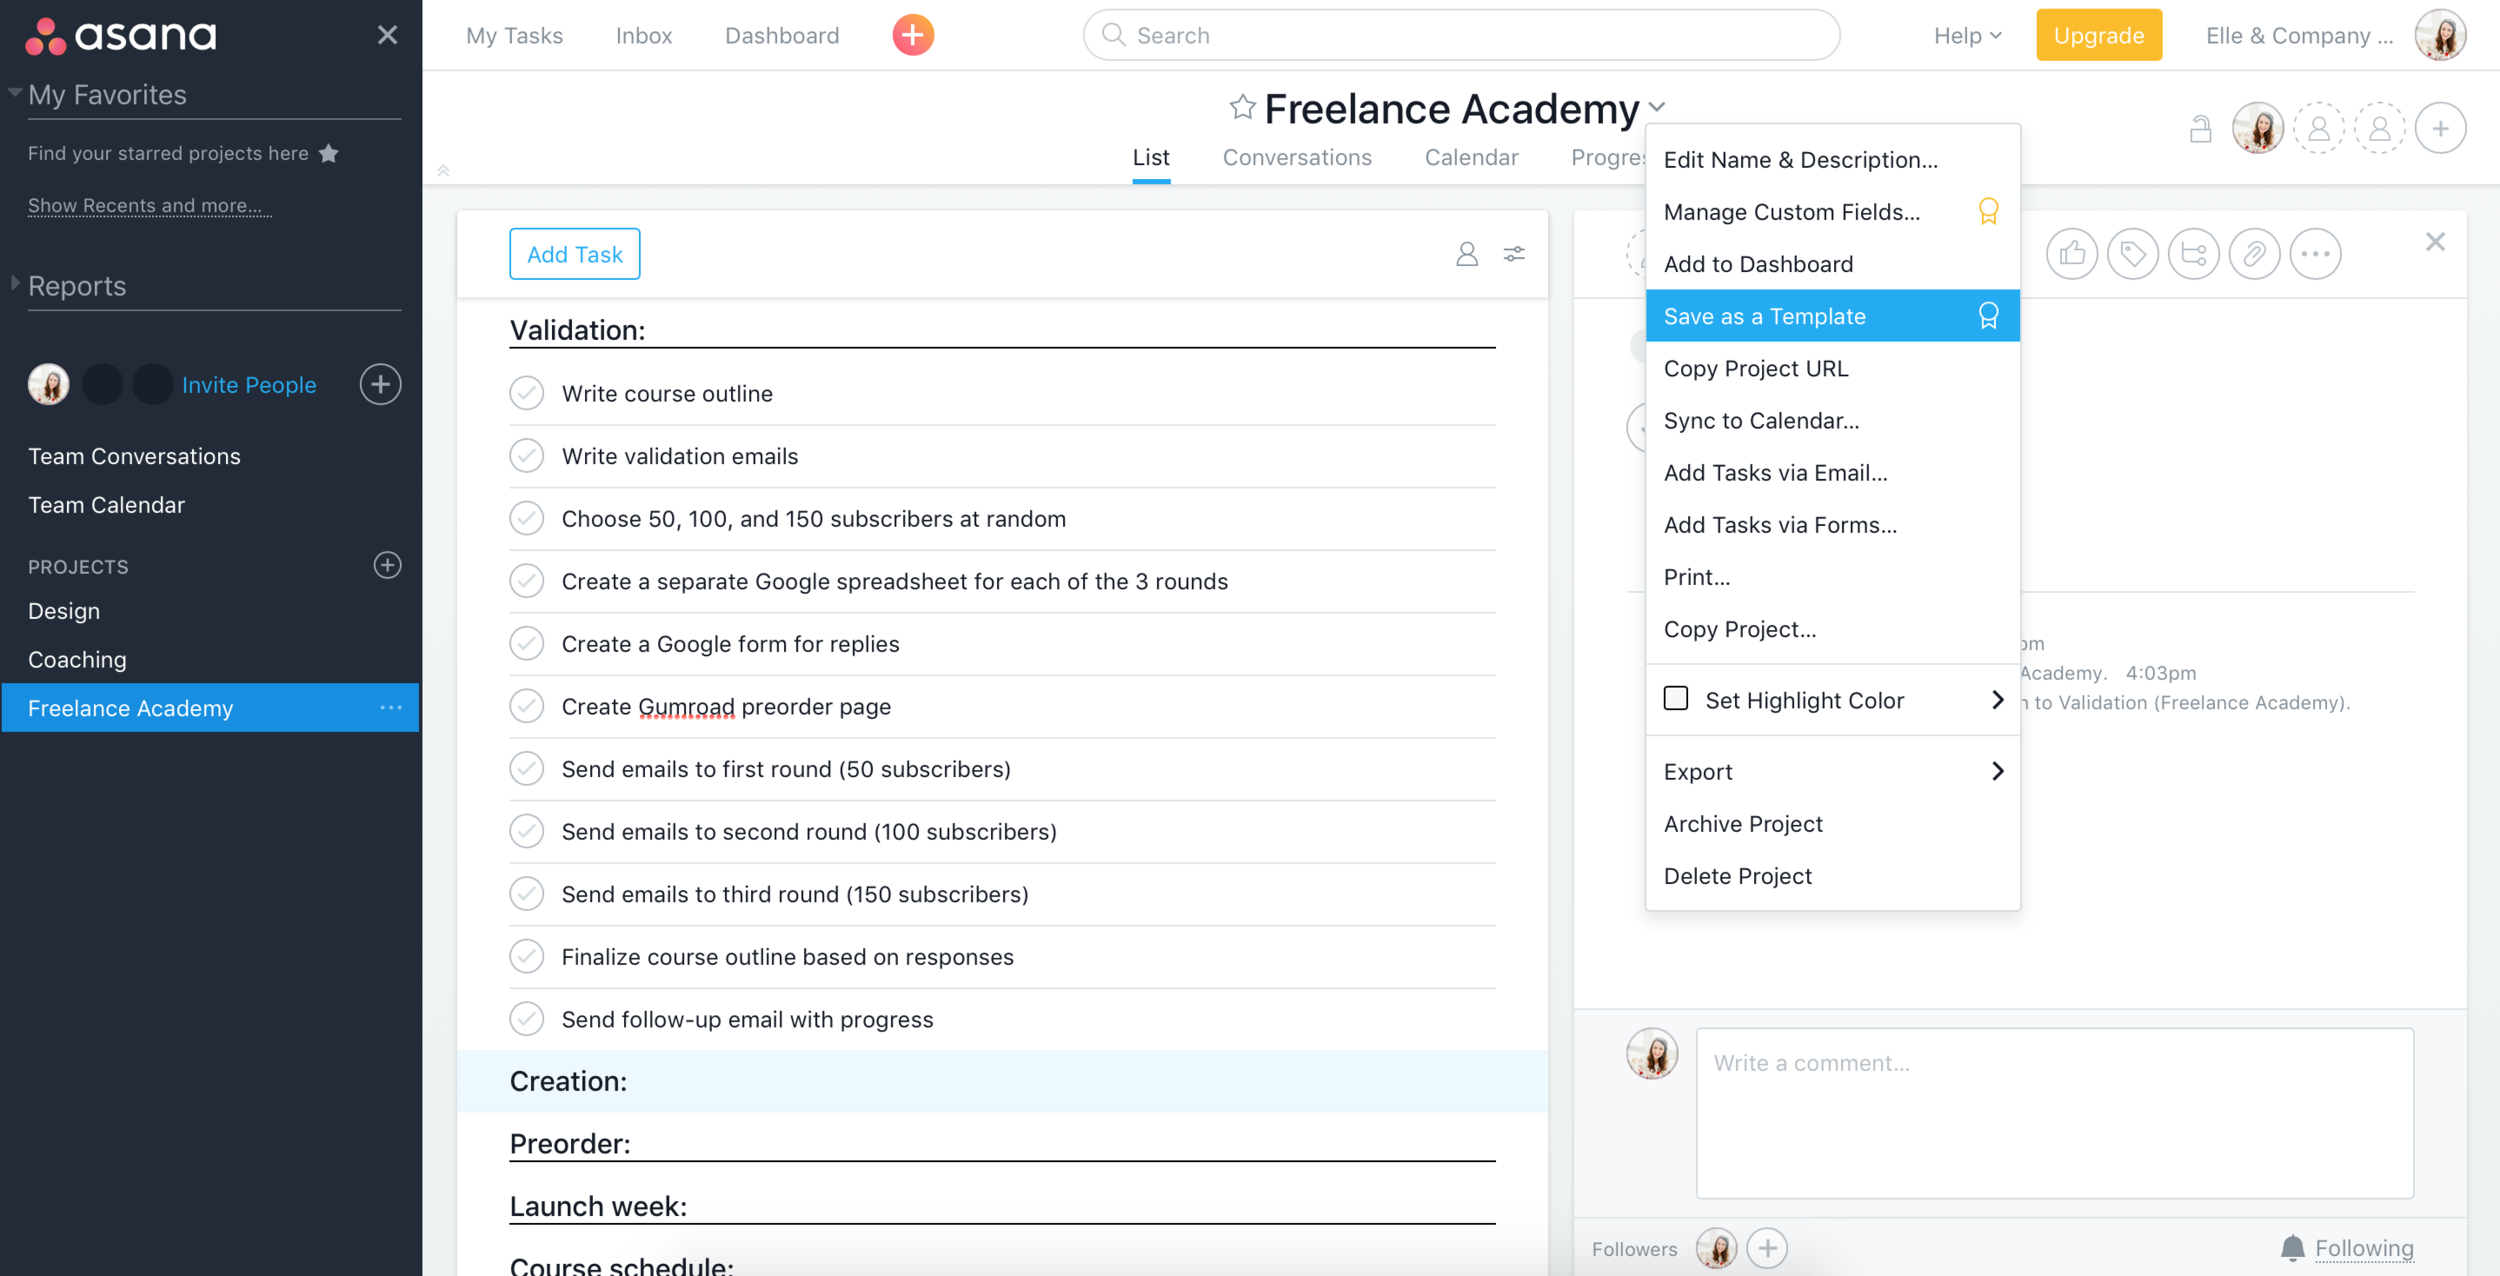
Once you’re done outlining all of the steps (and before you start assigning tasks and due dates), you might find it helpful to save this outline as a template for future products and launches.
You can create a template of your project by clicking on the project name at the top of the screen and clicking Save as a Template.
Or, if you aren’t using the premium version of Asana, you can click Copy Project…

...give it a name like “Product Template”...

...and it will appear as a new project in the left side of your screen. You can then copy it again in the future for new products.
Setting up a project for your content queue
Do you have blog posts, newsletters, and other content that goes live on your website and social media accounts each week?
Creating a project to keep up with all of your content can help you visualize it and keep track of it all in one place.
I like to call this project my Content Queue.
I start by creating a new project, naming it, and setting it up as a board.

Then I create a column for each day of the week…

...along with a column named Next Week and columns for each piece of content.

I like to use those extra columns (Blog Post Ideas, Ellechat Ideas, Newsletter Ideas) to brainstorm new content.
Once the columns are set up, I can begin adding tasks (or cards, if you’re familiar with Trello) to each column based on the content that’s going out on that day.

Eventually, after adding images, tags, due dates, and subtasks, my Content Queue looks something like this:

I’ll get to that in just a moment though!
Finish setting up your projects and then we can start to make them look pretty.
Setting up a project for administrative tasks
Some tasks won’t seem to fit in any project.
They aren’t client work, they aren’t pieces of content that need to be shared to your list or social media, and they don’t have to do with the creation or launch of a product.
But most of them fit into an Administrative or Random category, so I like to create a separate project for keeping up with them.
Start by creating a new project, giving it a name, and choose list view.

Then add the random tasks and sections.

Although the tasks in this section may be random, they don’t have to be kept up with at random!
Setting up a project for workflows
Do you have processes within your business that you run through time and again?
Outlining them in Asana can help you keep up with all the tasks involved, which is super helpful if you work on a team or plan to onboard new employees in the future.
I use my Workflow project to outline my processes for design work, coaching clients, Library additions, podcast episodes, newsletters, blog posts, and Ellechats. It acts as a reference guide as we set up tasks in the other projects in our dashboard.
Here’s how to do it.
Start by creating a new project, naming it Workflows, and setting it up as a board.

Then create a column for each of your processes.

In each column, add a task for each step of that process.

Then, once your processes have been outlined, you can assign each task to a team member, add prep work like files and email replies to each task, and more. (I’ll show you how to do that next!)
My Workflow project currently looks like this:

Color-coding projects
After you’ve set up a project for each area of your business, color code your projects for easy visual organization.
You can assign a color to each one by hovering over the project in the left menu, clicking the 3-dot icon, clicking Set Highlight Color, and choosing from the options.

3 | Add and customize tasks
Now that all of your projects are created and color-coded, it’s time to start adding and customizing tasks (the fun part).
Even though each task looks a little bit different in the list and board views, the features and the task window remain the same.
Here are a few of the things you can do to customize each task.
Adding sub tasks
You can add tasks within tasks in Asana. These subtasks help you break down the tasks even further.
To add a subtask, click the list icon at the top of the task.

These subtasks are great not only for organization, but they can be individually assigned to team members and given separate due dates.
This really comes in handy for all the tasks involved in client projects…

...and content creation.

Adding due dates
You can add due dates to tasks at the top of the task window…

...and you can due dates to subtasks by clicking the calendar icon next to the task.

You can also set a due time and set the task to repeat by clicking on the links in the calendar pop-up window.
Assigning tasks
Whether your business is a one-person operation or you have multiple members on your team, assigning tasks is a good habit to form from the start.
By assigning tasks, you ensure that all your to-do’s appear in the My Tasks section and in calendar view (I’ll show you how to access those in a moment).
They also ensure that your assistants or employees see all the tasks they need to be completing.
Just like with assigning due dates, you can assign tasks by clicking the person icon in the top left corner of the task window…

...and assign subtasks by clicking on the person icon next to the task.

Adding tags
Tagging tasks helps organize them into different categories.
This comes in handy for the Content Queue most of all, because it helps us visually keep track of all the different types of content going live each week.

We create a tag and color code it for blog posts (blue), newsletters (red orange), social media (green), Ellechats (purple), and Library additions (light pink), and courses (bright pink).
You can add a tag to a task by clicking the 3-dot icon at the top of the window, clicking Tags...

...and either choosing from tasks that are already created or adding a new tag.

Attaching files
You can also add files to your tasks and subtasks from your computer and other file management sites like Google Drive, Box, OneDrive, and Dropbox.
This is extremely helpful for keeping everything all in one place and file sharing between members of your team.
I don’t have to hunt down images or Google Docs when I’m working on a client project or a new blog post; it’s all accessible from the task in Asana.
To add a new file, click the paperclip icon at the top of the task, choose where you would like to add the file from…

...and follow the steps for tracking down the file.
The attached files will appear beneath your subtasks in the task window.
Attaching photos
You can attach photos just like you would any other file (see above), but the board project view allows you to set a cover image for each task.
Simply attach a photo to a task and it will appear in board view.
If you have more than one photo attached to a task, you can choose the cover image by clicking the arrow icon at the bottom of the task and choosing the right image.

You can also choose to show no image (but what’s the fun in that?).
Adding comments
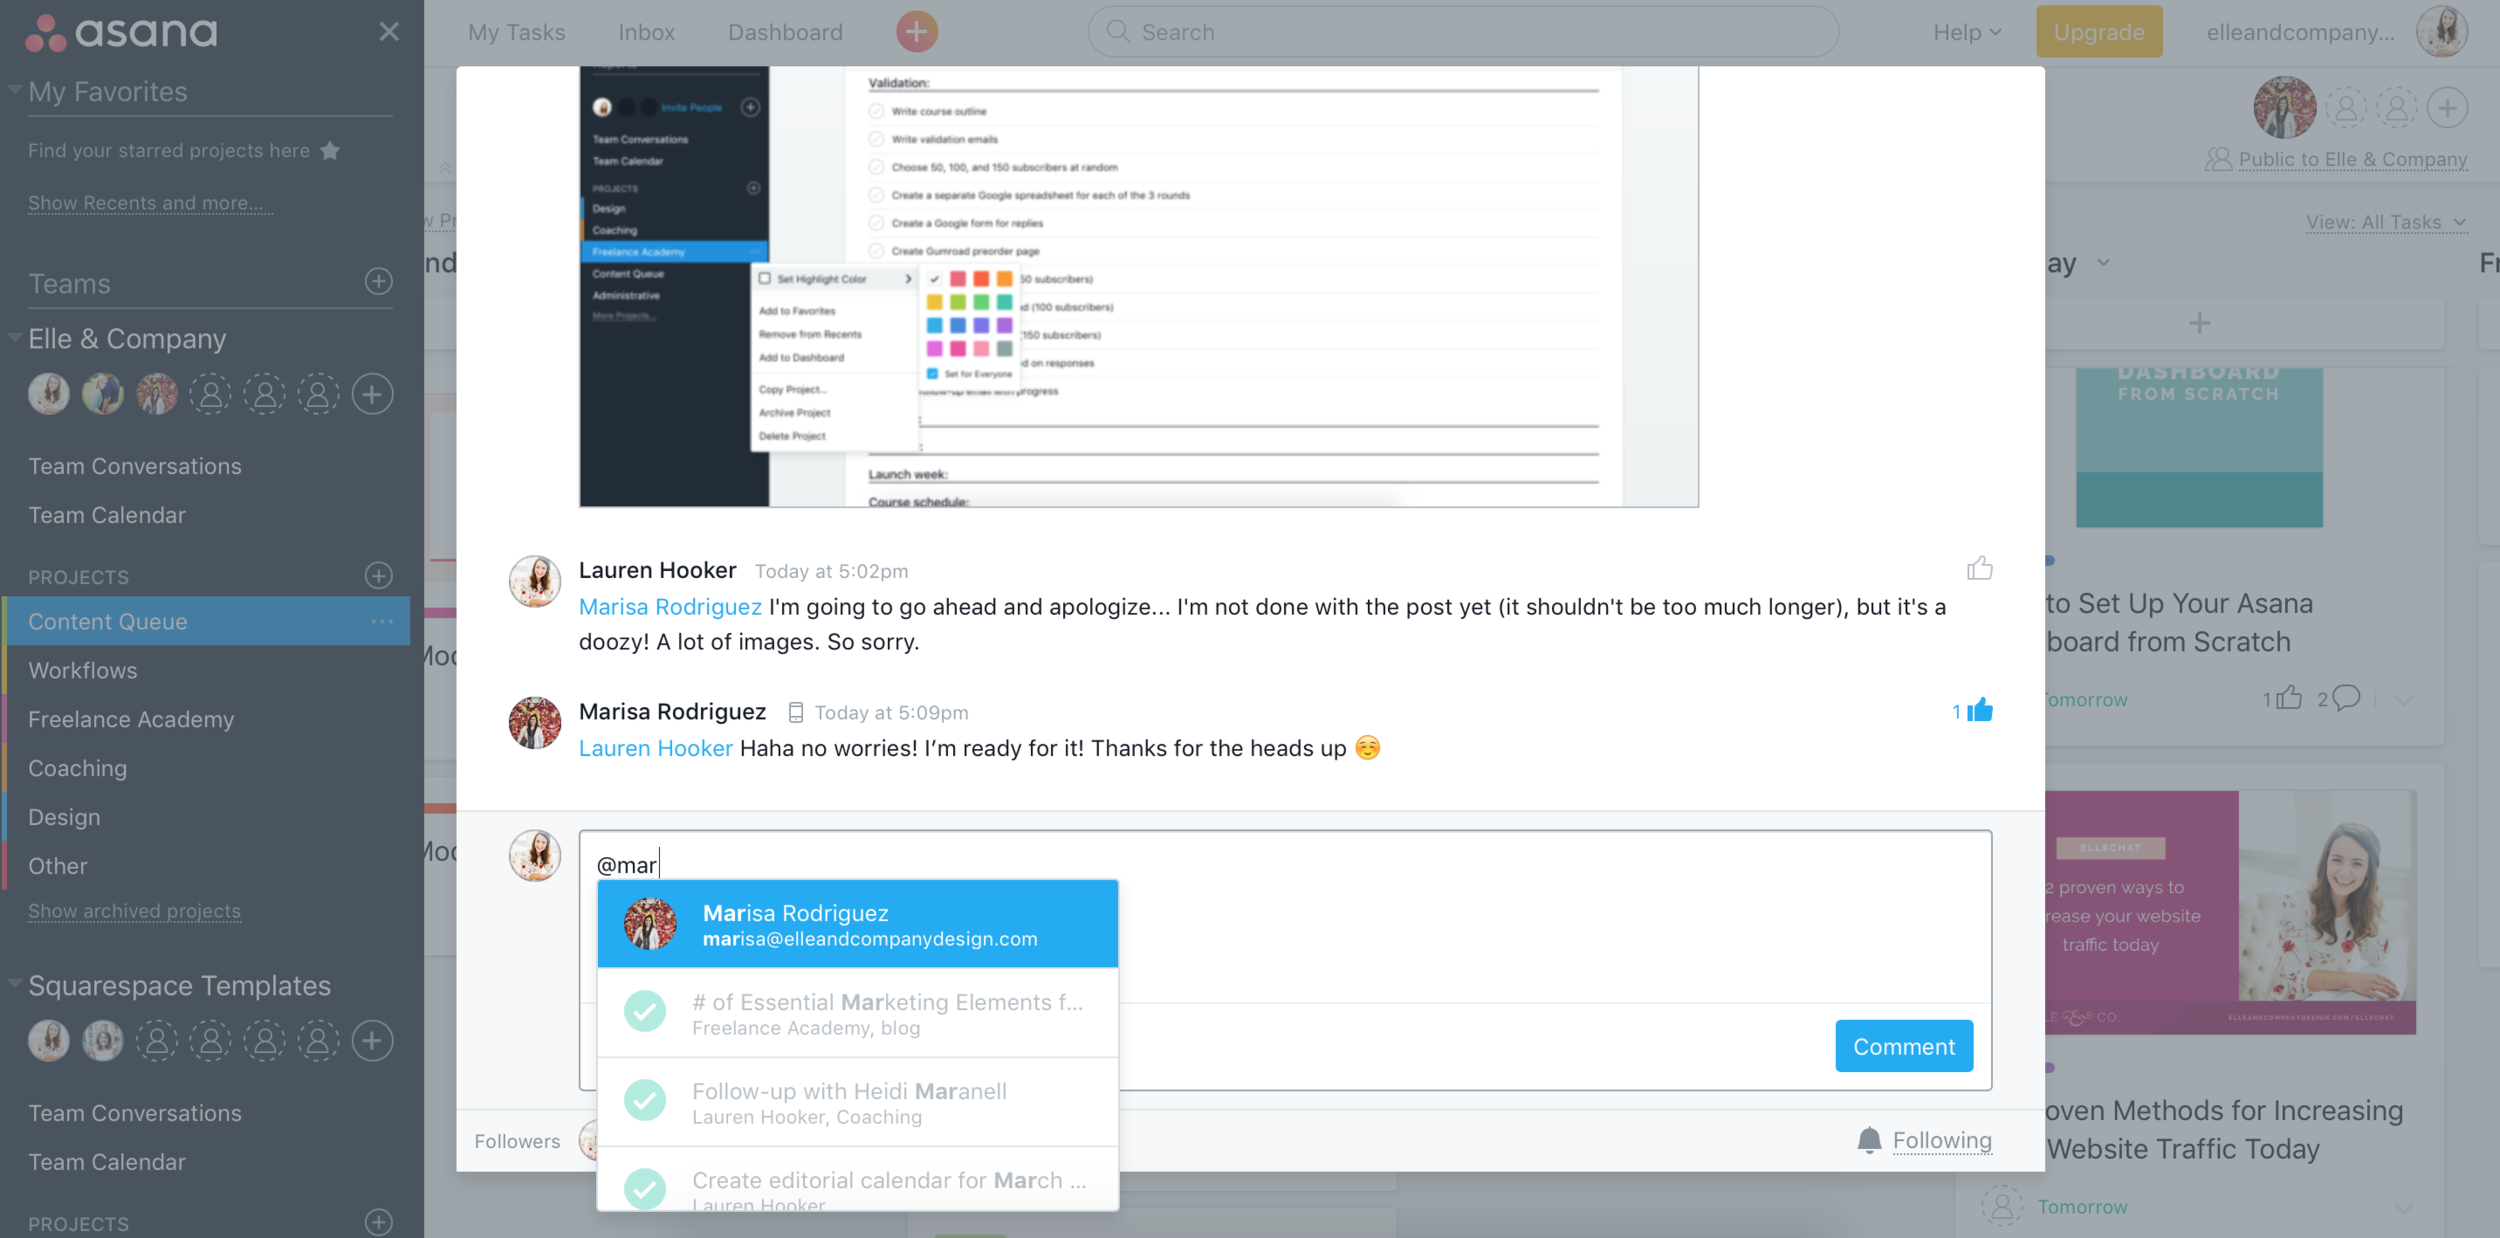
There’s also a space for you to add comments on a task at the bottom of the task window.
You can tag a team member to make sure they see the comment by using the “@” symbol and then typing their name.
Liking tasks
And last but not least, Asana recently added a “like” feature to the task.
My assistants and I use this feature to let each other know that we’ve seen the new task without writing a comment about it.
To like a task, simply click the thumbs up icon at the top of the task window…

...and to like a comment, click the thumbs up icon to the right of the comment.

4 | Keeping up with tasks
Now that your projects and tasks are set up and assigned, it’s ready to put Asana to work!
To keep up with all of your upcoming tasks, you can click on the My Tasks tab at the top of the Asana window.

You can click the gear icon at the top of the window to adjust the order of the tasks.

Would you rather see your tasks in calendar view? Click the Calendar tab at the top of the screen.

(Although I find that view slightly overwhelming at times!)
And lastly, if you’re leading a team and you want to see everyone’s tasks at a glance, you can click Team Calendar in the left menu.

Don’t forget to mark those tasks off as you complete them!
You might even see one of these guys jump across your screen to celebrate (my favorite part)...

The great thing about using Asana is that it’s very versatile.
There are many different ways that you can set it up through projects and tasks to make it work for your business.
Even if you don’t use it exactly the way my team and I use it for Elle & Company, I hope you were able to glean a couple of ideas for how to utilize this awesome project management tool for your business!


