

Last week I shared about my seemingly crazy experiment of deleting 7,000 subscribers from my list.
Long story short, it’s good to clean out your list every so often to make sure your emails are landing in the inboxes of people who want to receive them.
But once your list is “clean,” it’s time to take the proper measures to make sure your list is effective.
Email segmentation can be the primary difference between a list that converts and one that results in low open rates and a lack of engagement.
It isn’t enough to simply build your list; you have to be smart about how you organize it and use it.

Disclaimer: I am an affiliate for ConvertKit and there are affiliate links throughout this post. However, I only recommend products and tools that I use and love. And ConvertKit is definitely one of them!
What are segments?
ConvertKit defines email segmentation as “the process of putting your email subscribers into different buckets and speaking to each of those groups directly.”
By using segments, you can create different groups for the people on your list based on their interests and purchases.
This is especially helpful for creating more engagement with your subscribers, marketing your products, and generating more sales.
Segments allow you to work smarter.
Why do I need to segment my list?
1 | Segments allow you to target the specific interests of your subscribers
No two subscribers are alike.
Each one is uniquely going to enjoy different types of content, topics, and products from your business.
By segmenting your list, you can target their specific interests and send them content they care about (rather than sending them everything and losing their interest).
And when they receive the content they enjoy, there’s a higher likelihood that they’ll become both a subscriber and a customer.
2 | Higher open rates
The first goal of any email you send should be for your subscribers to actually open it.
When you segment your list and group your subscribers according to their interests, you can write more specific subject lines that will appeal to those interests.
Which naturally will result in higher open rates.
According to MailChimp, the average open rate among those who offer creative services is 22.41% (source).
But those who segment their list have 14.31% higher open rates than those who don’t.
That may not seem like a ton at first glance, but those extra opens can result in greater customer loyalty and thousands of dollars worth of revenue during a launch.
If you aren’t keeping up with your open rates at the moment, you can find them by clicking on Broadcasts at the top of your dashboard and looking at each individual email.

You can also see exactly who opened the email by clicking View Report to the right of the individual broadcast and then selecting Opens in the right-hand menu.

Which is both kind of creepy and kind of cool.
3 | More click-throughs
Once you’ve gotten them to open your emails, your next goal is to spur your subscribers into taking action.
That action could look like clicking a link to register for a webinar, purchase a product, or read a blog post.
But know this: Your list won’t help you accomplish your goals if you aren’t fostering engagement and causing your subscribers to interact with your content.
By segmenting your list, you’ll naturally see higher click-through rates (as high as 10-14%) and considering that the industry average across all email marketing platforms is roughly 6%, you’re looking at a 66% increase by segmenting your list (source).
You can view your click-through rates right beside your open rates under Broadcasts.
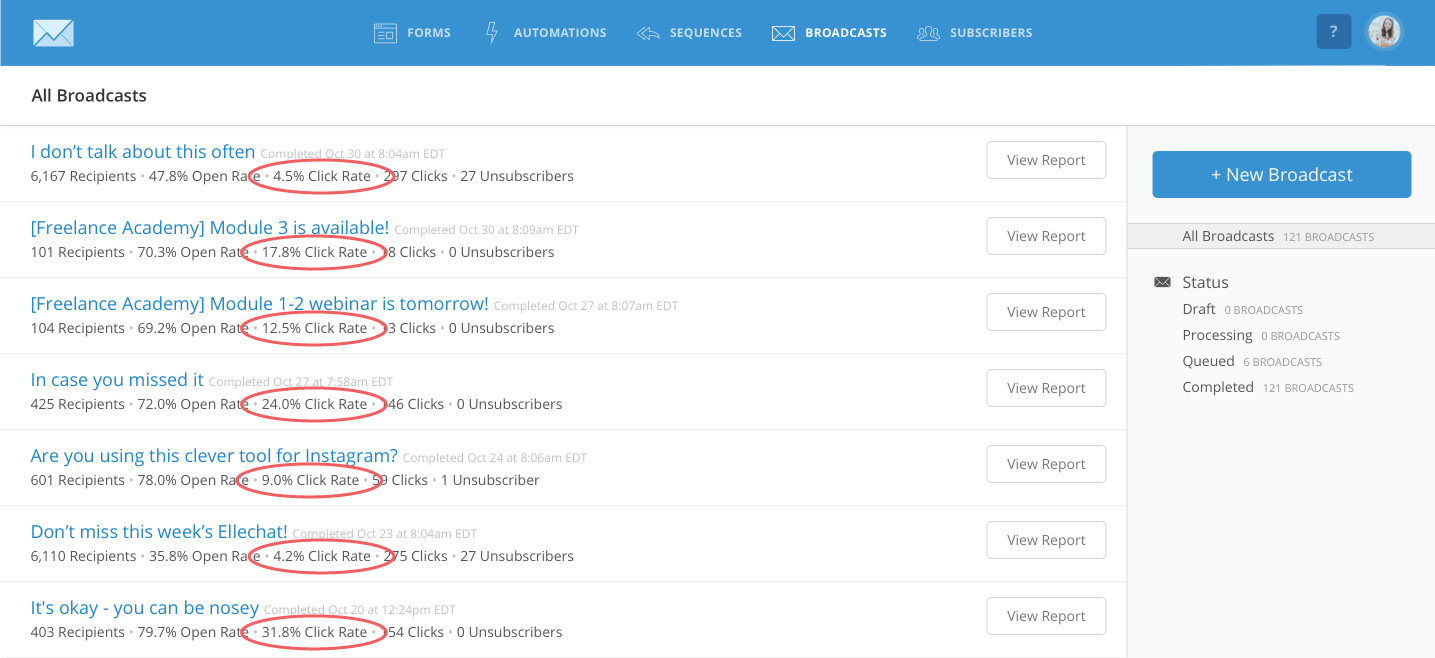
And you can see exactly which links were clicked (and who clicked them) by clicking View Report.

4 | Fewer unsubsribers
Like I talked about in last week’s Ellechat, people unsubscribing from your list can be a good thing. It’s a sign of a healthy list.
However, you don’t want people unsubscribing from your list at a rapid rate. (After all, these are potential customers and clients we’re talking about!)
When you send people the content they’re interested in, they don’t have any reason to unsubscribe.
And how do you know which content they’re interested in? By segmenting!
ConvertKit makes it easy to view how many unsubscribers are on your list. Simply look to the right of your open rate and click rate under your Broadcasts tab.

5 | Higher conversions
Higher open rates and click rates lead to higher conversions, which should always be the end goal of creating and utilizing a mailing list for your business.
By segmenting your list, you’re also able to keep up with who clicks the links in your emails (people who are obviously interested in what you’re offering) and send them targeted emails (with FAQs, more testimonials and case studies, a special offer) to help seal the deal.
So if you’re ready to get strategic with your list, increase engagement, and maximize conversions, segmenting is the first step.
Understanding how segments and tags work
Segments, tags, link triggers, automations - it sounds like a foreign language, doesn’t it?
It can be easy to get intimidated with new tools and strategies when they’re unfamiliar, but ConvertKit does a great job of simplifying these tools and making them easy to implement.
I’ll discuss link triggers and automations in another post on another day, but for now we’re going to focus on segmenting your list with tags.
Tags organize people based on their interests or actions.
So for example, I have separate tags for my different types of content. Subscribers on my list are tagged by their interest in blog posts, Ellechats, and newsletter content.

I also have separate tags for each one of my offerings: Adobe Illustrator Basics, Freelance Academy, The Library, etc.
One subscriber can have countless tags based on how they opted in, the links they’ve clicked on, etc.
Segments organize tags by grouping them together.

For example, I could create a segment called Customers that includes all of the tags of people who’ve purchased something from me.
How to set up tags and segments in ConvertKit
To set up a tag, click on Subscribers in the top menu. Then click Add Tag below the tags section in the right hand menu.
A pop up window will appear asking you to name your new tag.

You can begin adding people to that tag by using Rules.
To set up a rule, click Automations at the top of your ConvertKit dashboard and then Rules in the top right corner.

Click the big blue Add Rule button, and a ton of options will appear that allow you to trigger an action whenever someone opts into a form, clicks a link, purchases a product, etc.

Depending on how you want to tag people, your trigger will vary. But you can choose Add Tag under action to automatically tag subscribers according to what their interests are, where they opted-in from, etc. (keep reading for ideas for how to use these triggers).
To set up a new segment, click on Subscribers in the top menu, look under the Segments section in the right menu, and click Create a Segment.

From there, you can choose the tags that feed into that segment.
Ideas for segmenting your list in ConvertKit by using tags
While I wish there was a one-size-fits-all approach to the tags and segments you should setup for your business in ConvertKit, there isn’t.
The way you tag people and organize those tags into segments will depend on your own specific business and the goals you have for your list.
However, there are some clever ways to begin segmenting and tagging subscribers that span across all different types of businesses.
1 | Tag new subscribers according to their interests
Organizing your subscribers based on their interests is one of the best places to start when you’re segmenting your list. Especially if you can pinpoint their interests right from the moment they opt into your list. This will help you in the future as you come up with and launch new offering ideas.
Consider sending an automated welcome email to new subscribers and ask them what their primary hangup is by offering 3-5 different options.
The subscriber can respond by clicking the link that best suits where they’re at in their “customer journey,” and that link can trigger both a tag and even a sequence that acts as a sales funnel to one of your products.
2 | Tag customers according to their purchase
It’s also helpful to segment your list based on purchases. Create tags for each of your products and add people to those tags by connecting ConvertKit to Teachable, Gumroad, Shopify, or whatever ecommerce platform you use.
Then you can target that section of your list for new products that build off of or are similar to your current products. (Because after all, it’s easier to sell to previous customers than it is to find new customers!)
You can also choose to exclude that segment of your list from upcoming launch sequences for the same products they’ve already purchased.
3 | Tag attendees according to the event topic
People who attend your webinars, workshops, and other events are warm leads. They are obviously interested in your business and the content you share, so use the information from these events to segment your list.
At the very least, you should tag these subscribers based on the type of event. But you can take it one step further by tagging the subscribers based on the topic you covered during your event.
4 | Tag new subscribers according to the opt-in
Knowing where your subscriber found your business and opted-in from can tell you a lot about where they spend their time and what their interests are.
So begin tagging new subscribers based on their opt-in, whether it was from a guest post, podcast interview, webinar, content upgrade on your website, etc.
There are so many ways to use segments and tags to learn more about your subscribers and make your list work for you.
Instead of being intimidated by this unfamiliar topic and all of the ideas out there for segmenting your list, start small and begin implementing one or two of the ideas above with your own list. Once you master those, you can always continue to add on and get more creative.
Remember: It isn’t enough to simply grow your list. Success with your list comes from strategically organizing and managing it!
Have you begun to segment your list? If so, how are you currently setting up your tags and segments? If not, which of the ideas above are you going to start with?


