I’m all about organizing and creating systems to make business easier. So when we started getting everything ready for the launch of The Collaborative a couple months ago, I knew we needed to find a system for keeping up with submissions, due dates, to-do’s, etc.
We tried creating and sharing access to a Google calendar, but it didn’t help us keep up with contributors or cut back on the amount of emails that were necessary to communicate with everyone on board. Evernote was another option, but it wasn’t as simple or intuitive as we hoped it would be.
And then we heard about Trello, a collaboration tool specifically geared toward organizing projects. After doing a little bit of research to figure out how to utilize it best, we set up a free account and were amazed at how such a simple tool could have such a huge impact on the organization of our blog.
Those of you who blog regularly understand all of the moving parts and details involved with each post, especially if other people partner with you to create content. So today we’re sharing a behind-the-scenes look at how we use Trello to keep up with blog post ideas, create editorial calendars, and stay on top of all of our to-do’s for both the Elle & Company blog and The Collaborative.

Step 1 | Set up a board for your blog
Trello is made up of 3 organizational components: Boards, Lists, and Cards. We’re going to start with the big picture (Boards) and work our way down to the details (Cards).
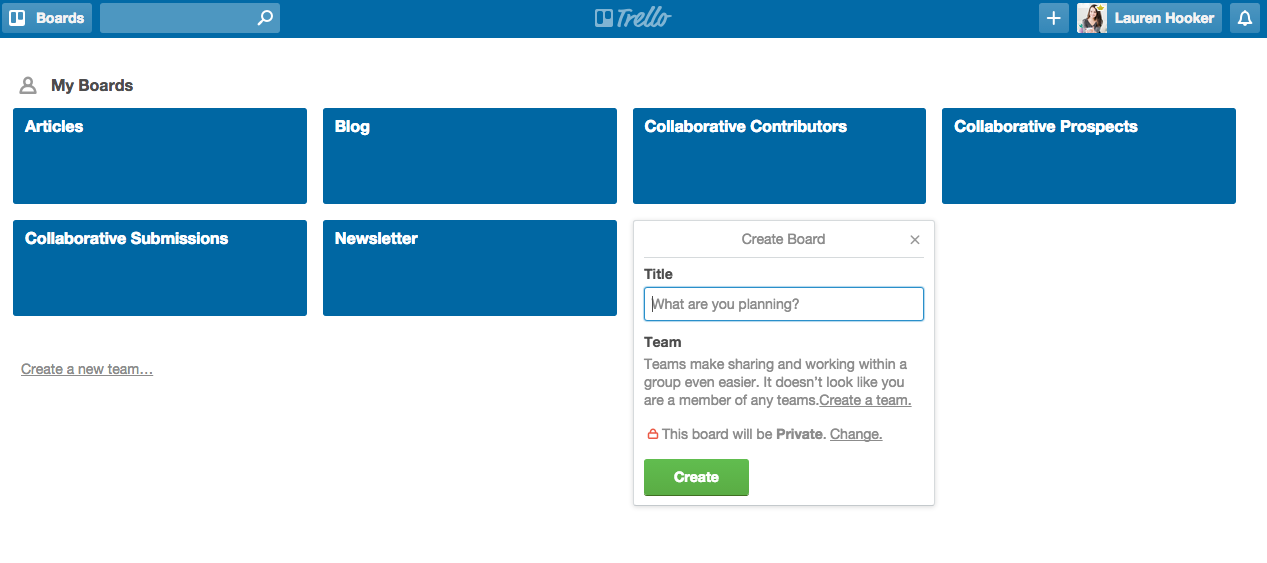
Trello keeps up with projects by organizing them into boards. Boards are for broad categories, topics, or subjects and they’re the largest organizational group within Trello.

For Elle & Company, we’ve set up boards for Collaborative contributors, Collaborative submissions, our newsletter, articles to share on social media, and our blog (and it seems like we’re adding to that list regularly).
Within each board’s menu, Trello allows you to add members. Each member has access to the board and can make edits, add new items, etc. This is especially helpful for collaborations and partnerships, and it makes tasks and processes much easier to keep up with.


Since Jake helps me brainstorm content for the Elle & Company blog, I’ve added him as a member to my Blog board. We also add contributors and guest posters to our Collaborative boards as new posts are submitted.
This not only helps cut back on emails, but it also allows each “board member” to see the entire project at a glance. This feature could also be extremely helpful for client projects, but I’ll save that for another post.
If you’re following along with this post as a tutorial, go ahead and set up a Trello board specifically for your blog. If multiple people contribute to your blog or partner with you to brainstorm ideas and create content, go ahead and add them as a member to the board, too.
Step 2 | Create a list for each stage of your publishing process
Each Trello board is broken down into smaller units called Lists. Lists help you create steps and outline a process for your projects.

Within Elle & Company’s Blog board, we have separate lists for Ideas, Drafts, Queue, and Published posts. We’ve ordered them in sequence from left to right as a timeline of sorts; posts start in the idea phase, move on to a draft, and land in our queue until they’re published.
Our lists for The Collaborative board are fairly similar.

Think through the timeline you use for setting up your blog posts. Within your new Board, create a list for each step of your publishing process.
Step 3 | Assign each blog post to a card
Now that we have our board set up and our lists in place, we can get even more detailed with Trello’s smallest organizational feature: cards.
Cards are the fundamental units of each board. They’re used to represent tasks, ideas, etc. and can easily be moved from one list to another.

For our Blog board, we set up a separate card for each one of our posts. Whenever we come up with a new idea for a blog post, we add a new card under our Idea list.
As the post moves into the draft, queue, and published phases, we drag and drop the corresponding card into the appropriate list. And because the lists are set up in order, we move the posts along the timeline, making it easier to see all of our posts at a glance and keep up with the entire process.
Not only is this a great way to keep up with our growing list of blog post ideas, but Trello allows us to add more information to the back of each card.

While a card may look fairly simple at first, there are several options available on the back of the card once you click on it.
Title
The area at the top of the dialogue box displays the title of your card and the list it’s currently in. You can edit either of those sections by clicking on them.

For our Blog board, we use the title section for the title of each post.
Description
Like the Title feature, this one is fairly straightforward. For blogging, you might use this section to give a brief synopsis of the post.

Activity/Comments
The bottom section of the dialogue box outlines all of the activity that’s taken place for each card. Trello also allows you to add comments here and tag members by using their specific handle.

There are more options available on the right side of the dialogue box and they’re added to the window as you click on them.
Members
You can add a member to each specific card, which has been especially helpful for The Collaborative. Each time we receive a guest post, we add a card to the draft list and add the author as a member to keep up with who’s writing each post. Trello also sends notifications to each member when changes are made to a card, which helps keep everyone up to date

Labels
If you have several different Trello boards and/or cards, the label feature can be helpful for sorting through everything. Trello allows you to distinguish between different labels by assigning a color to each one.

For blogging, you could easily use labels to keep track of your categories. The color feature could also be helpful for giving you an idea of which categories you’re writing about most and/or which categories are lacking and need to be focused on more.
Checklist
Checklists allow you to list tasks for each card. We usually list out each step of our blog process that needs to be completed: Outline, Edit, Blog graphic, and Schedule

Due Date
Trello helps you easily keep track of deadlines with their due date feature. We use due dates to plan out our editorial calendar and keep track of the days and times each post will go live.

Trello also allows you to see a calendar view of these due dates within the Board window by clicking the calendar icon in the top righthand corner.

Attachments
The attachment feature allows you to upload files from your computer, Google Drive, and Dropbox, and it also allows you to attach a link.

Because we write each blog post in a shared Google Doc (and we ask each Collaborative contributor to submit each guest post in Google Doc form), this feature is especially helpful for us. We click on Google Drive from the menu, select the document for the post, and Trello makes it easily accessible on the back of the card.

The options listed under Actions are fairly straightforward as well.
- Move allows you to move the card to a new list and choose its position within the list
- Copy creates a copy of the card, keeping the due dates, checklists, labels, etc. the same
- Subscribe notifies you whenever a comment is made to a card, due dates are changed, or when a card is moved to a new list
- Archive lets you archive cards you no longer need on your board without deleting them. In order to delete a card, you must archive it first.

With all of these options in mind, start creating cards for each blog post idea. As you follow the publishing process for each post, move the card along your “timeline” of lists to easily keep track of all the details.
Trello is so simple and user-friendly, yet it contains a lot of useful functionalities that allow you to customize it and make it work for your specific needs.
We’ve found it incredibly helpful for keeping up with both of our blogs and we continue to find ways to utilize it to organize other aspects of Elle & Company (like our newsletter and social media accounts).
We have a feeling you’ll find it useful, too.
Is this your first time hearing about Trello? If not, how do you use it for your blog and business?